Adorable Easter Bunny Cupcakes
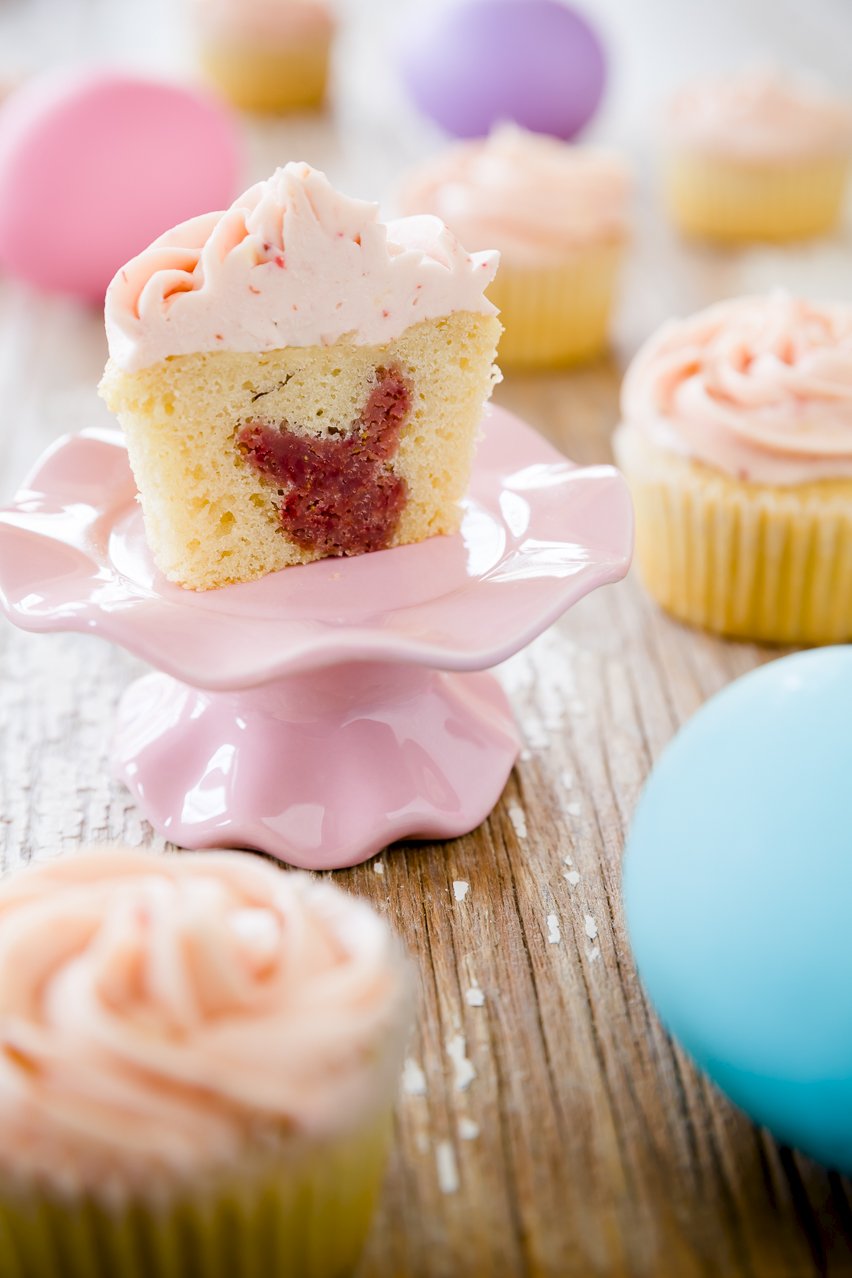
These adorable Easter Bunny Cupcakes have an Easter bunny surprise hidden inside of them! They look like basic vanilla cupcakes until you cut them open!
The best part is that it’s easy to make these cute and impressive Easter cupcakes!

Imagine the look of delight on someone’s face when they break open a cupcake and find a bunny hidden inside! These Easter themed cupcakes will brighten anyone’s day.
You can use any flavor of cupcake to make the Easter bunny cupcakes, but I suggest you pick a light color so that the bunny stands out. I make from-scratch vanilla cupcakes with strawberry cream cheese frosting.
How to Make Easter Bunny Cupcakes
The trick to making these Easter bunny cupcakes is learning the technique for making the hidden bunny inside. Although making a hidden bunny is my idea, the technique for hiding designs inside cake comes from the fabulous book Surprise-Inside Cakes [paid link] written by Amanda of I Am Baker.
Make a Hidden Easter Bunny
To make the hidden bunny, start with a combination of frosting and cake. It’s what Amanda calls “cake mixture.”
Bake a single cupcake before you bake the rest of the cupcakes. Combine that single cupcake with frosting to make the cake mixture.
Add red food coloring or strawberry powder the cake mixture to make it red.
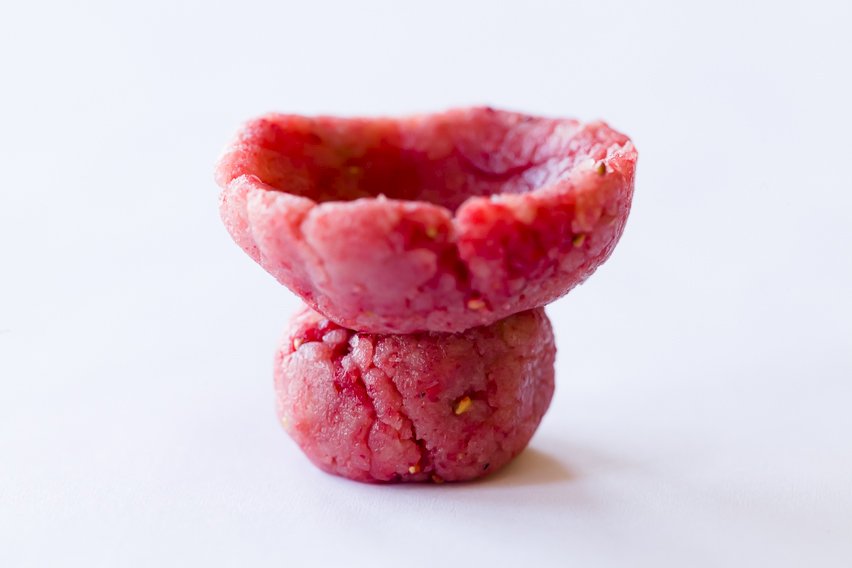
Shape the cake mixture so that it looks like the picture below. One of these will go inside of each cupcake and create a head and bunny ears.

True, this cake mixture looks nothing like a bunny. For this bunny cupcake recipe, we have to think in three dimensions.
When you take a ball of cake mixture and place a bowl-shaped piece of cake mixture on top of it, then slice it straight down the middle, you should have two pieces in the shape of a bunny. If you don’t believe me, grab some Play-Doh and try it yourself. I am seriously challenged in three-dimensional thought so I had to break out the Doh to see how this shape ends up looking like a bunny.
Prepare the Easter Bunny Cupcakes Using the Cake Bunny
To make the surprise bunny inside the Easter bunny cupcakes:
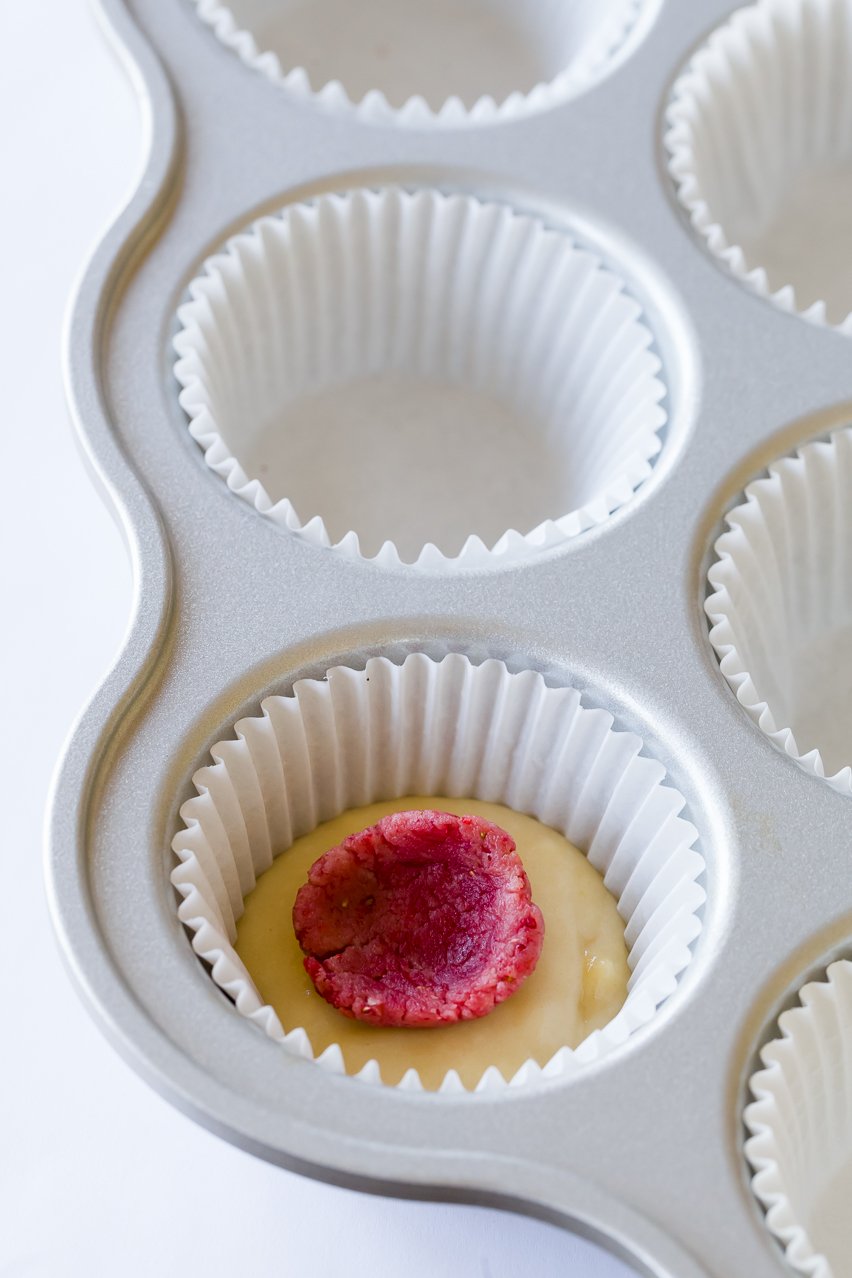
- Fill cupcake liners just 1/3 full with cupcake batter.
- Place a ball and bowl shaped cake mixture exactly in the center of the batter. As you see below, it should rise slightly over the batter.

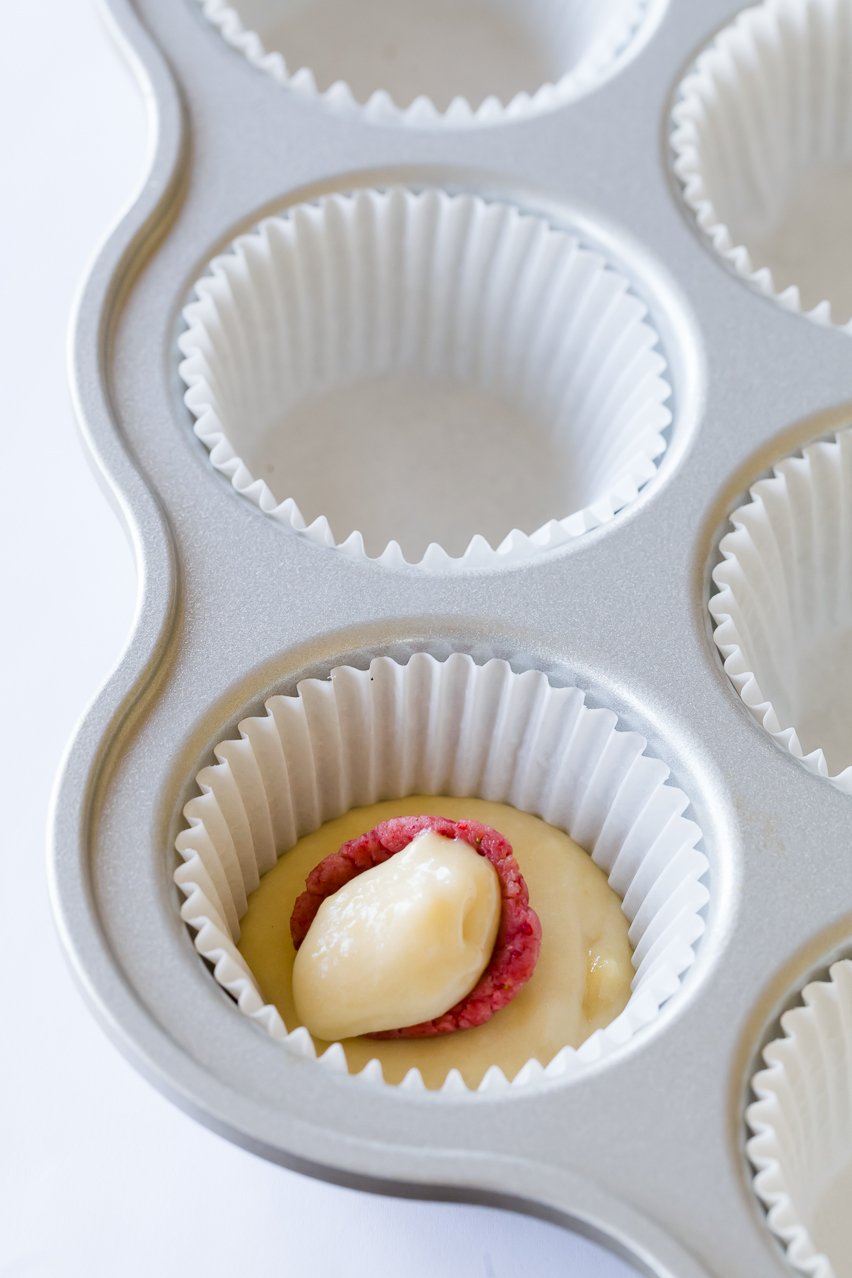
- Place a small dollop of batter into the bowl you made, as shown in the photo below. This ensures that there will be cake between the bunny’s ears.
- Add more cupcake batter, until it is 3/4 of the way to top of the liner.

Important Tip: I highly recommend that you make one or two test bunny cupcakes to get the knack of this before baking all of the batter. It can take some tweaking to make the bunny the perfect size and to get the batter to rise just the right amount.
FAQs
If you want to add another layer of bunny decoration, feel free to grab some marshmallows. Using food-safe scissors, cut them on a diagonal to make triangles and dip the sticky part into some pink sanding sugar. Then stick them into your frosting!
Fluffy and moist cupcakes are the result of well-combined batter that hasn’t been overmixed. The inclusion of sour cream in these easy bunny cupcakes also adds moisture and extra rich flavor.
Of course! Feel free to add other ingredients like mini chocolate chips in the cake mix as well for some chocolate flavor and pops of color around the bunny head.
Other Recipes for Easter Cupcakes
When I think of Easter cupcakes, I think of light cupcakes and festive spring flavors. Some of my favorite Easter cupcakes are:
- Carrot cupcakes (I top mine with cream cheese frosting and a candied carrot curl.)
- Angel food cupcakes with fresh berries
- Lemon cupcakes
- Easter cake in an egg (This is Easter cake baked in real egg shells! It’s a lot of work, but so impressive!)
Easter Bunny Cupcakes
Ingredients
Cupcake Ingredients
- 1 cup granulated sugar
- 1 vanilla bean
- 1 3/4 cups cake flour not self-rising
- 1 1/2 teaspoons baking powder
- 1/2 teaspoon baking soda
- 1/2 teaspoon salt
- 1/4 cup unsalted butter room temperature
- 2 large eggs room temperature
- 1/3 cup full-fat sour cream
- 1/4 cup canola oil you can also use vegetable oil
- 1 tablespoon vanilla extract use pure, not imitation
- 2/3 cup whole milk room temperature
Strawberry Frosting Ingredients
- 1 cup unsalted butter room temperature
- 16 ounces cream cheese room temperature
- 2 cups powdered sugar
- 2 tablespoons freeze-dried strawberries finely ground in a food processor
- 1/4 teaspoon salt
Cake Mixture Ingredients
- 1 baked cupcake
- 2 teaspoons strawberry frosting from above
- freeze-dried strawberries ground in a food processor, as needed – up to 1/2 ounce (you can also use a few drop of red food coloring if you prefer)
Instructions
Cupcake Instructions, Part One
- Preheat oven to 350 F (175 C).
- In a small bowl, combine sugar and seeds from the vanilla bean.
- Using the back of a spoon, move around the bowl and apply pressure to break up any clumps of seeds and to better infuse the vanilla flavor into the sugar. Set aside.
- In a medium-sized mixing bowl or bowl of a stand mixer, mix together cake flour, baking powder, baking soda, and salt.
- Add the vanilla bean sugar and mix until well combined.
- Add butter and mix on medium-low speed for three minutes. Because there is so little butter, you’ll end up with a very fine crumb texture.
- In a small mixing bowl, whisk together eggs, sour cream, oil, and vanilla extract until smooth.
- Add the egg mixture to the flour mixture and beat on medium speed until just combined.
- Slowly add milk and mix on low speed until just combined. The batter will be liquid. (Don’t worry, you didn’t do anything wrong. It’s supposed to be that way.)
- Fill a single cupcake liner just over 1/2 full. Bake for 14 minutes and then test to see if it’s done. It’s done when a toothpick comes out without wet batter stuck to it. The cupcake should appear white with specks of vanilla bean. It should not turn a golden brown. If it is not done, test again in two minutes. If it is still not done, test again in another two minutes. When the cupcake is done, remove it immediately from the tin and leave it on a cooling rack (or just on your counter if you don’t own a cooling rack) to cool.
- Fill the remaining cupcake liners 1/3 full with batter. There should still be some batter left over.
Frosting Instructions
- In a medium-sized mixing bowl, mix butter and cream cheese until light and fluffy (about three minutes at high speed).
- Mix in powdered sugar a little at a time.
- Mix in strawberry powder and salt.
- Cake Mixture Instructions
- Remove cooled baked cupcake from the liner and break into crumbs.
- Mix crumbs with 2 teaspoons of the frosting until it forms a Play-Doh-like consistency.
- Mix in the strawberry powder until the cake mixture becomes a color that you like.
Cupcake Instructions, Part Two
- Rip off pieces of the cake mixture and sculpt into the shape illustrated in this post – a small ball with a bowl on top that is just big enough to rise slightly above the batter.
- Place the ball/bowl shape in the center of each filled cupcake liner.
- Fill each bowl with a small dollop of batter.
- Bake for 20 minutes or until the cupcakes bounce back when lightly touched.
- The cupcake batter should have risen enough to completely hide the bunnies.
- Remove cupcakes from the tin and set on a cooling rack or the counter to cool.
- Pipe strawberry frosting onto cooled cupcakes.
- Serve with a knife and instructions to cut each cupcake open down the center. If people just bite quickly into the cupcakes, they will miss the surprise!
Notes
- I highly recommend that you do one or two test cupcakes to get the knack of this before baking all of the batter. It can take some tweaking to make the bunny the perfect size and to get the batter to rise just the right amount.
Loading comments...